 Beauty
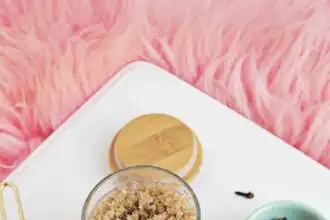
Homemade sugar scrub – a nice mess
I love all the spicy hot flavors that come with autumn -baked products and drinks. So many delicious delicacies float around during the holiday seasons, but don’t forget that you can use many of the same flavors and scents to also make sugar scrubs for gifts (or your own use)! I like a good cinnamon role, so I thought I would make an autumn chinnamic sugar coil with a touch of cloves and brown sugar added.Cinnamon Spice Sugar Scrub, makes 1 cupContentsLooking for more sugar scrubs and spa -diy’s to try? Credits // Author and photography: Laura Gummerman. Photos edited with a color story desktop.1/2 cup of white sugar1/2 cup of brown sugar1/4 cup of melted coconut oil6 drops of cinnamon leaf essential oil (make sure that your oil is cinnamon blade instead of cinnamon bark for use on the body)1/2 teaspoon of ground cloveGlass jar for storageAdd your brown and white sugar in a glass mixing bowl and stir to combine. Also mix in your ground herb nails.Melt your coconut oil and let your essential oil fall into your cinnamon. Stir to combine.Looking for more sugar scrubs and spa -diy’s to try?Make your own unicorn sugar scrubDo -It -Self Sugar Scrub yourselfVanilla latte coffee scrub diyPumpkin herbs sugar scrub DIYAdd your oil to the sugar and mix together. In a glass jar for gifts or storage.As soon as it all gets the hot water in the shower (and even just in the pot earlier), the cinnamon goes so well with the brown sugar and the hint of clove – does delicious! My favorite way to use a sugar scrub is to exfoliate my legs before I shave and I get a poet shave and softer legs after my shower. This sugar scrub has to keep for a few weeks and it is best to keep them on your counter instead of in the shower if you can keep it away from excess moisture. This scrub is a great way to start your day, is a great homemade gift and will have you in the autumn herb throughout the season! XO. Laura.u2c60774b0b4b571a2bd8ea65d10a4b57 { padding:0px; margin: 0; padding-top:1em!important; padding-bottom:1em!important; width:100%; display: block; font-weight:bold; background-color:#eaeaea; border:0!important; border-left:4px solid #34495E!important; text-decoration:none; } .u2c60774b0b4b571a2bd8ea65d10a4b57:active, .u2c60774b0b4b571a2bd8ea65d10a4b57:hover { opacity: 1; transition: opacity 250ms; webkit-transition: opacity 250ms; text-decoration:none; } .u2c60774b0b4b571a2bd8ea65d10a4b57 { transition: background-color 250ms; webkit-transition: background-color 250ms; opacity: 1; transition: opacity 250ms; webkit-transition: opacity 250ms; } .u2c60774b0b4b571a2bd8ea65d10a4b57 .ctaText { font-weight:bold; color:#464646; text-decoration:none; font-size: 16px; } .u2c60774b0b4b571a2bd8ea65d10a4b57 .postTitle { color:#9B59B6; text-decoration: underline!important; font-size: 16px; } .u2c60774b0b4b571a2bd8ea65d10a4b57:hover .postTitle { text-decoration: underline!important; } See alsoEmma's Skincare Routine - A Beautiful MessPS that pink sheepskin throw is so beautiful! One of my favorite pieces …Credits // Author and photography: Laura Gummerman. Photos edited with a color story desktop.FacebookPinterestTwitter
 Beauty
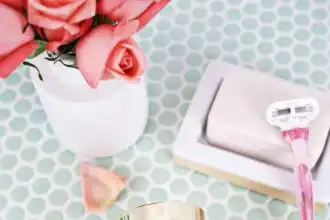
How you make beaten shaving foam
I don’t know how you are doing, but nothing feels as good as before going to sleep in clean sheets with a few freshly shaved legs. One of the “positive” side effects of being pregnant last year (except the baby at the end – ha!) Was that my growth of the leg hair was quite a bit delayed to where I barely had to shave and it was pretty glorious.However, that hormone ship has now sailed, so I am back to my usual shaving routine, but I wanted to add a beaten shaving cream -diy to my routine to see how it compared with other creams I used. I thought a pink geranium scented cream would be perfect and it turns out that making a light and downy natural shaving foam is easier than you think!Beaten rose geranium shaving foam, makes 2/3 cups1/3 cup of shea butter1/3 cup of coconut oil (use refined if you do not want to add coconut scent)2 tablespoons jojoba -oil2 tablespoons of unscented Castile Soap32 drops of pink geranium essential oilMeasure 1/3 cup of both your coconut oil and your shea butter and place in a double kettle or a heat -resistant glass bowl.Place the contents over a pan with boiling water and let the ingredients melt and stir every so often to combine.Allow the mixture to cool slightly and let your rose ethereal oil and jojoba oil fall, stir to combine. Place your mixture in the fridge for a few hours until it is solidified.Use an electric mixer to combine your cooled shaving foam for 2-3 minutes until it starts to look like beaten glaze. Add your Castile soap and mix another minute to combine..u1bbb2d6adc40ddfc6edcf617038d2434 { padding:0px; margin: 0; padding-top:1em!important; padding-bottom:1em!important; width:100%; display: block; font-weight:bold; background-color:#eaeaea; border:0!important; border-left:4px solid #34495E!important; text-decoration:none; } .u1bbb2d6adc40ddfc6edcf617038d2434:active, .u1bbb2d6adc40ddfc6edcf617038d2434:hover { opacity: 1; transition: opacity 250ms; webkit-transition: opacity 250ms; text-decoration:none; } .u1bbb2d6adc40ddfc6edcf617038d2434 { transition: background-color 250ms; webkit-transition: background-color 250ms; opacity: 1; transition: opacity 250ms; webkit-transition: opacity 250ms; } .u1bbb2d6adc40ddfc6edcf617038d2434 .ctaText { font-weight:bold; color:#464646; text-decoration:none; font-size: 16px; } .u1bbb2d6adc40ddfc6edcf617038d2434 .postTitle { color:#9B59B6; text-decoration: underline!important; font-size: 16px; } .u1bbb2d6adc40ddfc6edcf617038d2434:hover .postTitle { text-decoration: underline!important; } See alsoThe Summer Skincare SPF GuideKeep the mixture in an airtight container, do not avoid water in the pot and the shaving foam must be good for at least a month. As with all products with essential oils, stop using sensitivity or irritation.It’s crazy how much this looks like beaten glaze, because I kept telling myself not to eat it or lick my fingers (and my husband actually tasted it when I was out of the room because he thought it was glaze!). It looks great and smells!When using a bit of a thicker shaving foam, some people like to keep a cup of hot water nearby to wrap their razor in, but I usually just rinse it in the shower cladding.A word of warning but when using bathrooms with coconut oil in it: the floor of your shower (depending on the surface of the shower floor) can become a bit slippery if it washes away your legs, so keep it in mind or buy some of those non-slip mats if you prefer.I think it is great that this shaving cream leaves a bit of a soft coating on my legs, so that they feel that I already have a moisturizing cream when I go out of the shower, and I think it doubled that it contains all simple and natural ingredients while I both trick and my other creams and my other creams (while then better hydrates). I would say that this -it yourself is the cream of the crop! XO. LauraLooking for more essential oil-based do-it-yourselfers? Look at …– Natural Bug Repellent DIY–Rosemary Hair Growth Spray-Make your own cuticle oil.u1c2304453f853a8fa2d08ed8f2636e71 { padding:0px; margin: 0; padding-top:1em!important; padding-bottom:1em!important; width:100%; display: block; font-weight:bold; background-color:#eaeaea; border:0!important; border-left:4px solid #34495E!important; text-decoration:none; } .u1c2304453f853a8fa2d08ed8f2636e71:active, .u1c2304453f853a8fa2d08ed8f2636e71:hover { opacity: 1; transition: opacity 250ms; webkit-transition: opacity 250ms; text-decoration:none; } .u1c2304453f853a8fa2d08ed8f2636e71 { transition: background-color 250ms; webkit-transition: background-color 250ms; opacity: 1; transition: opacity 250ms; webkit-transition: opacity 250ms; } .u1c2304453f853a8fa2d08ed8f2636e71 .ctaText { font-weight:bold; color:#464646; text-decoration:none; font-size: 16px; } .u1c2304453f853a8fa2d08ed8f2636e71 .postTitle { color:#9B59B6; text-decoration: underline!important; font-size: 16px; } .u1c2304453f853a8fa2d08ed8f2636e71:hover .postTitle { text-decoration: underline!important; } See alsoWhat Happened When I Tried GrandeLASH-MD!Credits // Author and photography: Laura Gummerman. Photos edited with ACS for desktop actions.
 Beauty
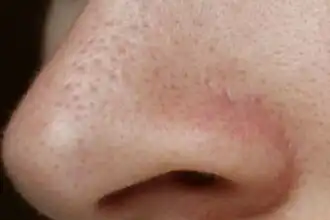
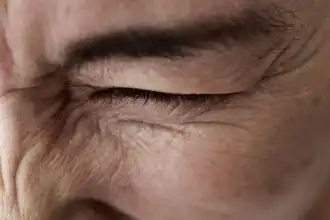
Apply this for 10 minutes and remove blackheads from your entire face
Say goodbye to blackheads appearing on your face and get instant results, apply this mixture for 10 minutes and see what happens!ContentsSay goodbye to blackheads appearing on your face and get instant results, apply this mixture for 10 minutes and see what happens!What are blackheads?Does this mixture work?What else you need to doDirectionsThose terrible black dots that appear in numbers can make even a handsome face dull and ugly. It’s a nightmare for most of us and there are only a lucky few who never have to deal with this terrible problem.What to do if numerous blackheads constantly appear on your face? Try this mixture!What are blackheads?Blackheads are a hallmark of acne and usually occur on the face, closer to the nose. More common during the hormonal changes around puberty. Additionally, they are the most common skin condition in America.Does this mixture work?Of course, you will see results immediately, within just 10 minutes of application. For good results you can continue to use it.What else you need to doIf you are thinking of hiding blackheads from makeup, drop this idea. Moreover, makeup is not the solution, it will only worsen the problem. It is better if you follow a healthy diet and avoid oily face and accumulation of dead skin to prevent this.DirectionsBefore using this, it is important to remove the dead skin from your face. Use a scrubber very carefully for this.Don’t rub hard!Once done, take a bowl, add 3-4 teaspoons of baking soda and add mineral water and stir until you get a thick, nice paste.Leave it on for 10 minutes and rinse the face with water. You will see the results immediately.For better results, repeat this 2-3 times a week..uf0ff17034d97f41ae1f771413b95eb09 { padding:0px; margin: 0; padding-top:1em!important; padding-bottom:1em!important; width:100%; display: block; font-weight:bold; background-color:#eaeaea; border:0!important; border-left:4px solid #34495E!important; text-decoration:none; } .uf0ff17034d97f41ae1f771413b95eb09:active, .uf0ff17034d97f41ae1f771413b95eb09:hover { opacity: 1; transition: opacity 250ms; webkit-transition: opacity 250ms; text-decoration:none; } .uf0ff17034d97f41ae1f771413b95eb09 { transition: background-color 250ms; webkit-transition: background-color 250ms; opacity: 1; transition: opacity 250ms; webkit-transition: opacity 250ms; } .uf0ff17034d97f41ae1f771413b95eb09 .ctaText { font-weight:bold; color:#464646; text-decoration:none; font-size: 16px; } .uf0ff17034d97f41ae1f771413b95eb09 .postTitle { color:#9B59B6; text-decoration: underline!important; font-size: 16px; } .uf0ff17034d97f41ae1f771413b95eb09:hover .postTitle { text-decoration: underline!important; } See alsoThis is the number one island in Mexico this year - and it's just 15 minutes from Cancun!
 Beauty
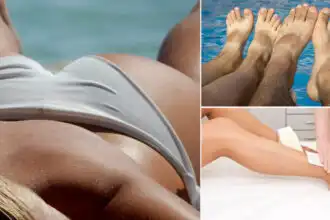
The faster to brown in the sun (10 secrets) ⋆ Clear things
Want to know ‘The faster to brown in the sun? “In this article, are exposed to the 10 most important secrets!If you cherish long hours in the sun and do not get the desired results, there must be something that you do wrong. By keeping these things in mind, you can get a quick color in the safest way.ContentsWant to know ‘The faster to brown in the sun? “In this article, are exposed to the 10 most important secrets!1. Exfolie the skin2. Moist your skin3. Use coconut oil4. Apply Sunscreen5. Use a tanning bed6. Cherish in the sun7. Choose a location8. Don’t forget to change position9. After browning10. Construction of TanConclusion1. Exfolie the skinThe process to get a perfect color even starts before you are in the sun and it starts with peeling the skin. Dialing helps to remove dead skin and exposes smooth skin, which will be more suitable for browning. You can use Loofa, Scrubbers or bath sponge and gently rub them on the skin.Caveat:Scrubbing hard can damage the skin, avoid that!2. Moist your skinYou can do any moisturizing lotion of the brand that you trust or preparehomemade moisturizer. Focus more in the areas that become dry more often. Hydrating the skin helps prevent flakiness when you get the color, and it will last a long time. Drinking a lot of water will also help to keep the skin hydrated.3. Use coconut oilCoconut oil is not only an excellent alternative to Moisturizer, but also helps you get a deep color because it is quickly absorbed in the sun in the sun and promotes the production of melanin. Unlike other skin care products, it is also free from chemicals. The antibacterial and antifferent properties in coconut oil keep you protected against harmful germs and bacteria when you are exposed to it..u47701ce7286decac7d1600c8d6e4fd81 { padding:0px; margin: 0; padding-top:1em!important; padding-bottom:1em!important; width:100%; display: block; font-weight:bold; background-color:#eaeaea; border:0!important; border-left:4px solid #34495E!important; text-decoration:none; } .u47701ce7286decac7d1600c8d6e4fd81:active, .u47701ce7286decac7d1600c8d6e4fd81:hover { opacity: 1; transition: opacity 250ms; webkit-transition: opacity 250ms; text-decoration:none; } .u47701ce7286decac7d1600c8d6e4fd81 { transition: background-color 250ms; webkit-transition: background-color 250ms; opacity: 1; transition: opacity 250ms; webkit-transition: opacity 250ms; } .u47701ce7286decac7d1600c8d6e4fd81 .ctaText { font-weight:bold; color:#464646; text-decoration:none; font-size: 16px; } .u47701ce7286decac7d1600c8d6e4fd81 .postTitle { color:#9B59B6; text-decoration: underline!important; font-size: 16px; } .u47701ce7286decac7d1600c8d6e4fd81:hover .postTitle { text-decoration: underline!important; } See alsoPopular Natural Ingredients in Moisturizers: What's Viral on Social Media?4. Apply SunscreenIt is very important that you use sunscreen before some sun exposure. Sunscreen prevents the solar radiation from causing damage and even entails a risk of skin cancer. There are some areas that you cannot reach alone, such as your back, help from your partner or friend to apply sunscreen to such body parts. If you surrender to the beach or water sports, it is advisable to adhere to water -resistant sunscreen. Choose a sunscreen with SPF 15 or higher. Tackle sunscreen again if you are in the sun for more than two hours.5. Use a tanning bedTANS SNIGHERS are used to speed up the solar process. They can be applied topically in the form of a lotion or orally taken as a pill. These accelerators promote the tanning bed by increasing the melanin in the body. *Melanin is the skin pigment responsible for the dark skin color.6. Cherish in the sunThe most obvious to get that attractive Tan goes out in the sun. Hit the nearest beach or just go down in a sunny location in your garden or roof. The best time to do that would be when the sunlight is at its peak strength in the afternoon. To make tanning bed more pleasant, you can read a book, listen to music, play every sport or do everything you like. It’s up to you!7. Choose a locationIt is important to choose the place you enjoy your free time to brown wisely. You don’t want the place to crow, otherwise people might come between you and the sunlight. Surfaces such as snow, water and sand also reflect sunlight, you get excess exposure from these reflected sun rays. So brown on the beach or nearby, the swimming pool is one of the secrets ofThe faster to brown in the sun.8. Don’t forget to change positionThe point that people often neglect while getting a tan is to move themselves. The body parts that are exposed to sunlight are tanned, but the not -exposed area remains the same as it was. It will lead to uneven brown skin. To prevent this, you change position in every 15-30 minutes to get the same color on the entire body..ufb47e65f6a287e11e9a9e57c7a61fe9a { padding:0px; margin: 0; padding-top:1em!important; padding-bottom:1em!important; width:100%; display: block; font-weight:bold; background-color:#eaeaea; border:0!important; border-left:4px solid #34495E!important; text-decoration:none; } .ufb47e65f6a287e11e9a9e57c7a61fe9a:active, .ufb47e65f6a287e11e9a9e57c7a61fe9a:hover { opacity: 1; transition: opacity 250ms; webkit-transition: opacity 250ms; text-decoration:none; } .ufb47e65f6a287e11e9a9e57c7a61fe9a { transition: background-color 250ms; webkit-transition: background-color 250ms; opacity: 1; transition: opacity 250ms; webkit-transition: opacity 250ms; } .ufb47e65f6a287e11e9a9e57c7a61fe9a .ctaText { font-weight:bold; color:#464646; text-decoration:none; font-size: 16px; } .ufb47e65f6a287e11e9a9e57c7a61fe9a .postTitle { color:#9B59B6; text-decoration: underline!important; font-size: 16px; } .ufb47e65f6a287e11e9a9e57c7a61fe9a:hover .postTitle { text-decoration: underline!important; } See alsoThis unique destination is one of Europe's best-kept secrets9. After browningIt is essential to clean up thoroughly after having spent time in the sun. It is to wash sunscreen, sand, sweat and dirt on the skin. Avoid scrub, because the upper tanned skin layer fades and the new white skin cells regenerate on the surface. Keeping the skin hydrated is also vital to get that shiny bronze appearance and to last longer for the color.10. Construction of TanTo reach that exotic dark brown, it is not enough to go into the sun only once or twice. You have to regularly cherish in the sun for an hour or two. Over time, the skin becomes darker and Tan becomes more prominent. Do not sit in the continuous for more than two hours, because this can cause sunburn.Also read:How gray hair to end with a single ingredientConclusionSo that’s how you can brown in the sun faster. If you like the article, share it. If there are suggestions or tips, write them below in the commentary section.
 Beauty
DIY protein mask to tighten sagging skin ⋆ BeautyNews
Replace chemical face masks with a more natural source by using eggs to make a homemade face mask. Read the article to know how to make a protein mask to tighten sagging skin.Beauty for many requires you to dig deep into your pockets. Beauty products are still being unveiled every day, but while some are affordable, their quality is being compromised. On the other hand, quality products are often very expensive. Does this mean you throw caution to the wind and let nature take its course on your beautiful skin? Or do you think of other smart and handy ways?ContentsReplace chemical face masks with a more natural source by using eggs to make a homemade face mask. Read the article to know how to make a protein mask to tighten sagging skin.Why you should start with the Egg Face Mask TreatmentWhy egg whites are the perfect face maskHow to prepare an egg face mask?How to applyBenefits of using the Egg Face Mask to tighten the skinWell, for those ruthless beauties who refuse to neglect their skin, the secret lies in a somewhat unique yet inexpensive product. Eggs! Who knows? The egg face mask has helped many women maintain flawless, youthful skin. Read on to learn more about how to use an egg white mask to tighten sagging skin.Why you should start with the Egg Face Mask TreatmentWhile aging is something no one can escape from, it is an unavoidable natural process. For this reason, the elasticity of your skin decreases as you age. This leads to sagging skin and the appearance of fine lines and wrinkles on different parts of the face..u8541031dd3a7cc98c3656e9306e7c4a8 { padding:0px; margin: 0; padding-top:1em!important; padding-bottom:1em!important; width:100%; display: block; font-weight:bold; background-color:#eaeaea; border:0!important; border-left:4px solid #34495E!important; text-decoration:none; } .u8541031dd3a7cc98c3656e9306e7c4a8:active, .u8541031dd3a7cc98c3656e9306e7c4a8:hover { opacity: 1; transition: opacity 250ms; webkit-transition: opacity 250ms; text-decoration:none; } .u8541031dd3a7cc98c3656e9306e7c4a8 { transition: background-color 250ms; webkit-transition: background-color 250ms; opacity: 1; transition: opacity 250ms; webkit-transition: opacity 250ms; } .u8541031dd3a7cc98c3656e9306e7c4a8 .ctaText { font-weight:bold; color:#464646; text-decoration:none; font-size: 16px; } .u8541031dd3a7cc98c3656e9306e7c4a8 .postTitle { color:#9B59B6; text-decoration: underline!important; font-size: 16px; } .u8541031dd3a7cc98c3656e9306e7c4a8:hover .postTitle { text-decoration: underline!important; } See alsoThe 10 Best Natural and Organic Lip BalmsOther reasons why you may start the egg face mask treatment include• Prolonged exposure to sunlight• Bad diet or bad eating habits• Bad moisturizing habits• Smoking and other negative lifestyle habitsWhy egg whites are the perfect face maskFor various reasons, the body is unable to produce the natural essential oil known as sebum. Sebum is responsible for protecting the skin and keeping it hydrated. Once the amount of oil decreases, the skin begins to slacken or wrinkles appear.Egg whites contain up to 69 crucial proteins that have been found to be necessary for restoring skin elasticity. The egg face mask tightens the skin, albeit temporarily, to help alleviate fine lines.How to prepare an egg face mask?Here are the simple steps to make an egg white face mask:Pick one or two fresh eggs, depending on the size of the eggs.Break the eggs and pour the contents into a clean bowl.Separate the egg yolks from the whites.Discard the egg yolks.Beat the egg whites that are still in the bowl until foamy.How to applyNow that you’ve prepared the egg white, it’s time to use it on your face.Take a good dip with your two fingers and apply the egg white all over your face.Make sure to apply it liberally all over the face.Don’t forget to include the upper eyelid, behind your ears and all over your neck.Wait at least 30 minutes for the mask to dry completely.Wash it off with cold water.Dry your face with a soft towel..u3873f5b8c590149fd148ff2bb12ae080 { padding:0px; margin: 0; padding-top:1em!important; padding-bottom:1em!important; width:100%; display: block; font-weight:bold; background-color:#eaeaea; border:0!important; border-left:4px solid #34495E!important; text-decoration:none; } .u3873f5b8c590149fd148ff2bb12ae080:active, .u3873f5b8c590149fd148ff2bb12ae080:hover { opacity: 1; transition: opacity 250ms; webkit-transition: opacity 250ms; text-decoration:none; } .u3873f5b8c590149fd148ff2bb12ae080 { transition: background-color 250ms; webkit-transition: background-color 250ms; opacity: 1; transition: opacity 250ms; webkit-transition: opacity 250ms; } .u3873f5b8c590149fd148ff2bb12ae080 .ctaText { font-weight:bold; color:#464646; text-decoration:none; font-size: 16px; } .u3873f5b8c590149fd148ff2bb12ae080 .postTitle { color:#9B59B6; text-decoration: underline!important; font-size: 16px; } .u3873f5b8c590149fd148ff2bb12ae080:hover .postTitle { text-decoration: underline!important; } See alsoPrioritize your mental health for beautiful skin this year!Keep in mind that you should do that on your ownuse cold water and not warm or hot waterto wash off the face mask. Eggs are sensitive to heat and can be difficult to remove with hot water. In addition, it is advisable to pat your face dry, rather than vigorously rubbing the water off. You want to keep the firm skin for as long as possible.If you feel itching or develop a rash and redness on your face after applying the egg face mask, it may be an indication that you are allergic. If so, you can try other natural face mask recipes here.Benefits of using the Egg Face Mask to tighten the skinIn addition to tightening the face, you can benefit greatly by using the egg face mask to tighten the facial skin. Research shows that eggs are high in vitamin A. Vitamin A is a crucial ingredient needed to minimize wrinkles and heal wounds. If you have oily skin, egg face packs can naturally discourage your skin from producing too much oil.To make the egg face mask treatment more effective, you can add pure vitamin E oil, milk and honey to the egg white before applying it on your face. This can help you get even better results by improving the texture of your face and shrinking the pores on your face.To maintain healthy skin, it is advisable to adopt positive habits such as using quality products that also contain sunscreen. This helps prevent damage from exposure to UV damage. It is also essential to moisturize your skin regularly, as dry skin is the fastest way to develop wrinkles. The saying that you are what you eat proves to be true here. So watch what you eat. Add more vitamins to your diet and eat a healthy diet in general, and you will have glowing, healthy and firm skin..u5e0fcf8b85a71a2369451f9fd133972d { padding:0px; margin: 0; padding-top:1em!important; padding-bottom:1em!important; width:100%; display: block; font-weight:bold; background-color:#eaeaea; border:0!important; border-left:4px solid #34495E!important; text-decoration:none; } .u5e0fcf8b85a71a2369451f9fd133972d:active, .u5e0fcf8b85a71a2369451f9fd133972d:hover { opacity: 1; transition: opacity 250ms; webkit-transition: opacity 250ms; text-decoration:none; } .u5e0fcf8b85a71a2369451f9fd133972d { transition: background-color 250ms; webkit-transition: background-color 250ms; opacity: 1; transition: opacity 250ms; webkit-transition: opacity 250ms; } .u5e0fcf8b85a71a2369451f9fd133972d .ctaText { font-weight:bold; color:#464646; text-decoration:none; font-size: 16px; } .u5e0fcf8b85a71a2369451f9fd133972d .postTitle { color:#9B59B6; text-decoration: underline!important; font-size: 16px; } .u5e0fcf8b85a71a2369451f9fd133972d:hover .postTitle { text-decoration: underline!important; } See alsoThe 10 Best Natural and Organic Sunscreens 2025
 Beauty
5 Stevia Benefits For Skin You Should Know About! ⋆ Bright things
Stevia plant is an excellent substitute for sugar and is used as a sweetener. The health benefits of stevia are countless, but in this post, we are going to know some of the manyStevia benefits for the skin.1. Prevents wrinklesContentsStevia plant is an excellent substitute for sugar and is used as a sweetener. The health benefits of stevia are countless, but in this post, we are going to know some of the many Stevia benefits for the skin.1. Prevents wrinkles2. Stops signs of aging3. Reduces acne4. Fights dermatitis or eczema5. Mask for dry skinHaving wrinkled skin, especially at a young age, can be daunting. Wrinkled skin makes you look older than you actually are. Stevia leaves can effectively help you achieve wrinkle-free, youthful skin. The paste of ground stevia leaves or its liquid extract can be applied directly to the face. After about 15-20 minutes, wash your face thoroughly and dry it with a towel. As the face gets dry, it is important to use a moisturizer afterwards.2. Stops signs of agingAs you already know, this is one of the most importantstevia benefits for skinis that it prevents wrinkles. In addition, Stevia also lowers the intake of sugar. Regular intake of sugar has many adverse effects on our health. One of the possible harms that sugar causes is that our skin sags, wrinkles and ages prematurely. It happens because of glycation where sugar makes the collagen stiff and brittle by binding to it. Collagen gives structure to our skin, which keeps our skin smooth and young. The intake of stevia instead of sugar not only ensures that collagen is not broken down, but it is also rich in antioxidants; making it an excellent choice to protect our cells from free radicals..u60c0eb31bd35feac8abe752b55eb4393 { padding:0px; margin: 0; padding-top:1em!important; padding-bottom:1em!important; width:100%; display: block; font-weight:bold; background-color:#eaeaea; border:0!important; border-left:4px solid #34495E!important; text-decoration:none; } .u60c0eb31bd35feac8abe752b55eb4393:active, .u60c0eb31bd35feac8abe752b55eb4393:hover { opacity: 1; transition: opacity 250ms; webkit-transition: opacity 250ms; text-decoration:none; } .u60c0eb31bd35feac8abe752b55eb4393 { transition: background-color 250ms; webkit-transition: background-color 250ms; opacity: 1; transition: opacity 250ms; webkit-transition: opacity 250ms; } .u60c0eb31bd35feac8abe752b55eb4393 .ctaText { font-weight:bold; color:#464646; text-decoration:none; font-size: 16px; } .u60c0eb31bd35feac8abe752b55eb4393 .postTitle { color:#9B59B6; text-decoration: underline!important; font-size: 16px; } .u60c0eb31bd35feac8abe752b55eb4393:hover .postTitle { text-decoration: underline!important; } See alsoSkin Emergencies on a Wedding Day and How to Solve Them!3. Reduces acneThe leaves of the Stevia plant possess antibacterial and antiseptic properties. Inflammation in the sebaceous glands causes the formation of acne. This inflammation-causing bacteria can be controlled with the use of stevia extract. Not only will it reduce the acne, but it will also prevent it from coming back. You will also notice a visible difference in various skin problems such as blemishes, scars, rashes and itchiness. Having said this, in today’s lifestyle full of unhealthy foods and pollution, theseStevia benefits for the skinare much needed by many of us. It is a natural source to clear acne, saving you from the adverse effects of commercial products.4. Fights dermatitis or eczemaSkin conditions such as dermatitis and eczema can cause a lot of discomfort. The skin becomes red, itchy and inflamed. You can also develop flaking that comes from flaking dry skin. Stevia’s antibacterial properties make it useful for treating these skin conditions. Apply it topically to the affected area for best results. People suffering from skin infections and diseases often find a natural solution to relieve their inflammation. ThisStevia benefit for skininfection may be one of the best ways to mitigate the condition.5. Mask for dry skinDry skin is very sensitive and using store bought products can lead to various skin conditions as these products are not natural. You can make a chemical-free face mask that is perfect for dry skin. You will need a raw egg yolk, a tablespoon of Stevia extract and a tablespoon of glycerin and mix them thoroughly in a bowl. Apply this paste in the mixture and leave it alone for 10-15 minutes. Wash your face with water and pat it dry. You can use this face mask daily or on alternate days..ue8a55d8f1704ff8292dc232283ca25e4 { padding:0px; margin: 0; padding-top:1em!important; padding-bottom:1em!important; width:100%; display: block; font-weight:bold; background-color:#eaeaea; border:0!important; border-left:4px solid #34495E!important; text-decoration:none; } .ue8a55d8f1704ff8292dc232283ca25e4:active, .ue8a55d8f1704ff8292dc232283ca25e4:hover { opacity: 1; transition: opacity 250ms; webkit-transition: opacity 250ms; text-decoration:none; } .ue8a55d8f1704ff8292dc232283ca25e4 { transition: background-color 250ms; webkit-transition: background-color 250ms; opacity: 1; transition: opacity 250ms; webkit-transition: opacity 250ms; } .ue8a55d8f1704ff8292dc232283ca25e4 .ctaText { font-weight:bold; color:#464646; text-decoration:none; font-size: 16px; } .ue8a55d8f1704ff8292dc232283ca25e4 .postTitle { color:#9B59B6; text-decoration: underline!important; font-size: 16px; } .ue8a55d8f1704ff8292dc232283ca25e4:hover .postTitle { text-decoration: underline!important; } See also20 DIY lotion bar recipesIf you happen to know moreStevia benefits for the skinApart from this, share with us in the comment section!
 Beauty
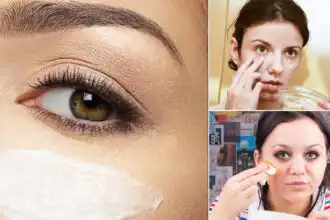
5 DIY under eye mask recipes to get rid of dark circles and bags
Bags and dark circles under the eyes will make your face look tired and older. To get rid of this, here are somewhat nutritiousDIY under eye maskRecipes.All theseDIY under eye maskRecipes are 100% natural and have no side effects, unlike chemical products.ContentsBags and dark circles under the eyes will make your face look tired and older. To get rid of this, here are somewhat nutritious DIY under eye mask Recipes.1. Fine cucumber mask2. Rose water DIY under eye mask3. Protein mask mask4. Tomato and yogurt mask5. Baking powder and milk eye mask1. Fine cucumber maskCucumber has a soothing effect on the eyes; That is why cucumber slices are usually placed over the eyes. It is also rich in vitamin C, so it also has skin lighting and tighter effects. This -the self -mask will relieve fatigue and feed you under the eyes.You need:GelatinLavender oilCucumberHot waterButter paperSteps:Each add a tablespoon in a glass bowl -Gearomatized gelatin, warm water and cucumber juice. Mix all these ingredients until you obtain a uniform gel -like pasta.Add 2-3 drops of lavender essential oil to this pasta and beat again. Spread this mixture on a butter paper using a spoon or spatula.Allow this mix to cool down at room temperature. Cut the butter paper in the form of semicircle and place it under your eyes.After about 20 minutes, remove these gels pads and wash your face.Also read: DIY Eye Mask Recipes.u4550561f627ff6bdf33f1e24f26ad29c { padding:0px; margin: 0; padding-top:1em!important; padding-bottom:1em!important; width:100%; display: block; font-weight:bold; background-color:#eaeaea; border:0!important; border-left:4px solid #34495E!important; text-decoration:none; } .u4550561f627ff6bdf33f1e24f26ad29c:active, .u4550561f627ff6bdf33f1e24f26ad29c:hover { opacity: 1; transition: opacity 250ms; webkit-transition: opacity 250ms; text-decoration:none; } .u4550561f627ff6bdf33f1e24f26ad29c { transition: background-color 250ms; webkit-transition: background-color 250ms; opacity: 1; transition: opacity 250ms; webkit-transition: opacity 250ms; } .u4550561f627ff6bdf33f1e24f26ad29c .ctaText { font-weight:bold; color:#464646; text-decoration:none; font-size: 16px; } .u4550561f627ff6bdf33f1e24f26ad29c .postTitle { color:#9B59B6; text-decoration: underline!important; font-size: 16px; } .u4550561f627ff6bdf33f1e24f26ad29c:hover .postTitle { text-decoration: underline!important; } See also17 homemade body lotion recipes for dry skin in winter2. Rose water DIY under eye maskRooswater is an effective remedy for tired -looking eyes, whether because of the lack of sleep or because of stress. Also, just like cucumber, it also has a soothing and relaxing effect on the eye.You need:DishRose waterCotton pillowsSteps:Cut two cotton pads into a semi -circular shape using sharp scissors.Take Rosewater in a bowl and immersed cotton pads in it. You can also pour drops of rose water on the cotton pad.Place these pads under your eyes and leave it behind for about 15 minutes. After just one use you will perceive a considerable difference in ramparts.3. Protein mask maskThis DOE -the self -mask promotes collagen growth in the skin that in turn is beneficial to get rid of wrinkles. You can also add honey to this mix for sensitive and dry skin.You need:Steps:Separate two proteins from the yolk and pour them into a bowl. Add a tablespoon. From honey in this mix.Beat the egg whites and honey until you get a uniform fishing choice solution.Apply this pasta under your eyes with a makeup brush or with your fingertips.Let it dry for 10 minutes and then wash your face with lukewarm water.4. Tomato and yogurt maskIf the dark circles are under the eye that you are worried about, this unique mix of tomatoes and yogurt will certainly remedy that. Tomatoes are rich in antioxidants and remove excess oil, making the skin under the eyes brighter. Lactic acid present in yogurt helps to remove dark spots under the eye..u903c55eb461824649134c2461c1495dc { padding:0px; margin: 0; padding-top:1em!important; padding-bottom:1em!important; width:100%; display: block; font-weight:bold; background-color:#eaeaea; border:0!important; border-left:4px solid #34495E!important; text-decoration:none; } .u903c55eb461824649134c2461c1495dc:active, .u903c55eb461824649134c2461c1495dc:hover { opacity: 1; transition: opacity 250ms; webkit-transition: opacity 250ms; text-decoration:none; } .u903c55eb461824649134c2461c1495dc { transition: background-color 250ms; webkit-transition: background-color 250ms; opacity: 1; transition: opacity 250ms; webkit-transition: opacity 250ms; } .u903c55eb461824649134c2461c1495dc .ctaText { font-weight:bold; color:#464646; text-decoration:none; font-size: 16px; } .u903c55eb461824649134c2461c1495dc .postTitle { color:#9B59B6; text-decoration: underline!important; font-size: 16px; } .u903c55eb461824649134c2461c1495dc:hover .postTitle { text-decoration: underline!important; } See alsoBest 8 Nail Polishes for a DIY ManicureYou need:Procedure:Place a small tomato and a tablespoon. From yogurt in a blender and switch it on. Apply this mixture under your eyes and let it sit there for 20 minutes. Wash your face with lukewarm water and towel.5. Baking powder and milk eye maskThe hanging skin that you get under your eyes is usually caused by lack of sleep and fatigue. Milk and baking powder When they are combined, can do wonders for the tired eyes.You need:MilkSodium carbonateSpatulaGlass bowlSteps:Pour four tablespoon of fresh full milk and two tablespoons of baking powder in a small bowl.Mix these ingredients using a spoon to a creamy, consistent mixture.Put the glass in a fridge for about an hour and then remove it.Apply this cooled mix under your eyes and forget the next 20-25 minutes.Wash your face, especially face the area with cold water and see the difference.
 Beauty
Browned Flour for Diaper Rash
Wondering if Browned Flour for Diaper Rash is effective or is merely an age-old myth? Here’s everything you need to know!Browned Flour for Diaper Rashis an age-old recipe used and suggested by moms to relieve their babies from painful skin rashes. However, the present generation relies more on science than home remedies when it comes to health and wellness. If you are one of them, let’s dive into a detailed discussion of this problem and look beyond the otherDiaper Rash Remediesto help your little one enjoy a happy dance!ContentsWondering if Browned Flour for Diaper Rash is effective or is merely an age-old myth? Here’s everything you need to know!Does Baby Oil expire? Learn hereWhat Is Diaper Rash?What Causes Diaper Rash?Does Shea Butter Clog Pores? Learn hereBrowned Flour for Diaper Rash—Effective or Not?How to Use Browned Flour for Diaper RashOther Natural Remedies for Diaper Rash1. VaselineLearn How to Use Lemon Juice and Vaseline for Dark Circles here2. Coconut Oil3. Olive OilHow to Prevent Diaper Rash?When to Visit a Doctor?Is Cocoa Butter Comedogenic? Learn hereDoes Baby Oil expire? Learn hereWhat Is Diaper Rash?lauraelizabethgrahamDiaper rash, popular as nappy rash, is a painful skin condition caused by bacterial or fungal infections that affect infants, leading to soreness, redness, scaliness, and tenderness in the area around their buttocks. This condition can also occur in adults, though it is less common.Fortunately, diaper rash can be treated at home with proper care and prevention measures. Now the question arises—ifBrowned Flour for Diaper Rashis effective or not? Let’s find out!.u8363cb6d8c2bc06959e5437fd3af851a { padding:0px; margin: 0; padding-top:1em!important; padding-bottom:1em!important; width:100%; display: block; font-weight:bold; background-color:#eaeaea; border:0!important; border-left:4px solid #34495E!important; text-decoration:none; } .u8363cb6d8c2bc06959e5437fd3af851a:active, .u8363cb6d8c2bc06959e5437fd3af851a:hover { opacity: 1; transition: opacity 250ms; webkit-transition: opacity 250ms; text-decoration:none; } .u8363cb6d8c2bc06959e5437fd3af851a { transition: background-color 250ms; webkit-transition: background-color 250ms; opacity: 1; transition: opacity 250ms; webkit-transition: opacity 250ms; } .u8363cb6d8c2bc06959e5437fd3af851a .ctaText { font-weight:bold; color:#464646; text-decoration:none; font-size: 16px; } .u8363cb6d8c2bc06959e5437fd3af851a .postTitle { color:#9B59B6; text-decoration: underline!important; font-size: 16px; } .u8363cb6d8c2bc06959e5437fd3af851a:hover .postTitle { text-decoration: underline!important; } See alsoCucumber Beauty Tips | 12 things you can do with cucumber to enhance your beautyWhat Causes Diaper Rash?The primary reasons for diaper rash in babies are as follows:Friction caused between the baby’s skin and the diaperExposure of the skin to feces or urine for a prolonged periodIrritation from baby wipes, soaps, or detergentIntake of antibioticsYeast or bacterial infectionUse of wet diapersDoes Shea Butter Clog Pores? Learn hereBrowned Flour for Diaper Rash—Effective or Not?shutterstock/Thitiwat.DayThere are no scientific claims that support the potency ofBrowned Flour for Diaper Rash. However, it is an age-old remedy professed in many households, and considering the fact that there are not any side effects either, you can useBrowned Flour for Diaper Rashof your baby.It absorbs the moisture and creates a protective layer that heals the bacterial and fungal infection of the baby’s soft skin, thus preventing further irritation. Also, the anti-inflammatory properties of flour will curb the irritation.Flour, being a natural ingredient, is gentle on the newborn’s soft skin and is a better option than commercial baby powders that might contain chemicals and irritate your baby’s bum.Note: Do not use Browned Flour for Diaper Rash if it is a yeast infection. It might cause irritate the condition more.How to Use Browned Flour for Diaper RashUsing burnt or browned flour for diaper rash is an easy remedy and requires some simple steps:Preheat the pan on medium flame and pour two tablespoons of flour into the heated pan.Stir flour with a spoon until it turns brown before turning off the flame.Let it cool, and dust the brown powder around the affected area.Repeat this thrice daily, and the rash must clear off within 3-4 days..uf64361fb8ab0b0d0586f1feef5af8382 { padding:0px; margin: 0; padding-top:1em!important; padding-bottom:1em!important; width:100%; display: block; font-weight:bold; background-color:#eaeaea; border:0!important; border-left:4px solid #34495E!important; text-decoration:none; } .uf64361fb8ab0b0d0586f1feef5af8382:active, .uf64361fb8ab0b0d0586f1feef5af8382:hover { opacity: 1; transition: opacity 250ms; webkit-transition: opacity 250ms; text-decoration:none; } .uf64361fb8ab0b0d0586f1feef5af8382 { transition: background-color 250ms; webkit-transition: background-color 250ms; opacity: 1; transition: opacity 250ms; webkit-transition: opacity 250ms; } .uf64361fb8ab0b0d0586f1feef5af8382 .ctaText { font-weight:bold; color:#464646; text-decoration:none; font-size: 16px; } .uf64361fb8ab0b0d0586f1feef5af8382 .postTitle { color:#9B59B6; text-decoration: underline!important; font-size: 16px; } .uf64361fb8ab0b0d0586f1feef5af8382:hover .postTitle { text-decoration: underline!important; } See alsoBenefits of tanning you didn't know ⋆ BeautyNewsOther Natural Remedies for Diaper RashIf you cannot rely onBrowned Flour for Diaper Rashor are looking for other remedies, here are a few you must try!1. VaselinestockphototrendsAs per the American Academy of Dermatology Association, Vaseline is an excellent diaper rash remedy for kids’ soft skin. It will create a barrier on the baby’s skin that’ll heal any bacterial or fungal infection caused due to wet diapers.Additionally, this petroleum jelly is an inexpensive and safe option for babies. For treatment, clean your baby’s bum, and pat dry with a cotton cloth. Next, rub a dab of Vaseline on the affected area, followed by a clean diaper.Learn How to Use Lemon Juice and Vaseline for Dark Circles here2. Coconut OilWith a plethora of skin benefits, coconut oil can heal and prevent diaper rash without posing any side effects.Coconut oil is loaded with anti-inflammatory, anti-microbial, and anti-viral benefits that soothe itching and inflammation related to diaper rash. And let’s not forget the moisturizing properties of the oil that adds to the pros.First, clean your child’s bottom, then apply a tsp of virgin coconut oil to the affected area. Before putting on a new diaper, let the skin absorb the oil completely. Your baby will be relieved within 2-3 days.3. Olive OilagricolataurinoBesides being loaded with beneficial fatty acids, olive oil has anti-inflammatory, antioxidant, and moisturizing properties that create a protective layer against moisture and microorganisms on the baby’s skin.Additionally, olive oil is a safe and chemical-free alternative to commercial diaper creams, which can contain harsh ingredients that may further irritate sensitive skin..u071413c8deb980ca0d5b7fdb9552ee15 { padding:0px; margin: 0; padding-top:1em!important; padding-bottom:1em!important; width:100%; display: block; font-weight:bold; background-color:#eaeaea; border:0!important; border-left:4px solid #34495E!important; text-decoration:none; } .u071413c8deb980ca0d5b7fdb9552ee15:active, .u071413c8deb980ca0d5b7fdb9552ee15:hover { opacity: 1; transition: opacity 250ms; webkit-transition: opacity 250ms; text-decoration:none; } .u071413c8deb980ca0d5b7fdb9552ee15 { transition: background-color 250ms; webkit-transition: background-color 250ms; opacity: 1; transition: opacity 250ms; webkit-transition: opacity 250ms; } .u071413c8deb980ca0d5b7fdb9552ee15 .ctaText { font-weight:bold; color:#464646; text-decoration:none; font-size: 16px; } .u071413c8deb980ca0d5b7fdb9552ee15 .postTitle { color:#9B59B6; text-decoration: underline!important; font-size: 16px; } .u071413c8deb980ca0d5b7fdb9552ee15:hover .postTitle { text-decoration: underline!important; } See also14 vegetable -cerin used | Glycerine for Beauty ⋆ Clear thingsAfter patting dry the baby, massage a few drops of olive oil on the affected area and repeat it twice daily, so it clears off within a few days.How to Prevent Diaper Rash?Now that you knowBrowned Flour for Diaper Rashis effective, here are a few prevention tips that’ll avoid the infection in the first place. Change the newborn’s wet and dirty diapers without any delay.When changing your child’s diaper, clean their buttocks carefully using lukewarm water and gently pat their skin dry. Refrain from scrubbing, as it can cause inflammation and discomfort to your baby’s delicate skin.Avoid alcohol-based or scented products for the baby’s bottom.Avoid overtightening the baby’s diaper, which might chafe or irritate the baby’s skin.When to Visit a Doctor?There are plenty of Diaper Rash Remedies that are totally efficient for treating this condition. However, you may visit the doctor is:There is little to no improvement after following the remedies for three days.Your baby is contracted with fever due to diaper rash.The area bleeds, itches, or oozes liquid.Your baby’s bottom develops blisters.The folds of your baby’s skin turn red or develop pus.You have a hunch of yeast infection rather than microbial.Is Cocoa Butter Comedogenic? Learn here
 Beauty
DIY hit Cacao Body Butter
I am currently the owner of a fast -growing baby hump, which means that I do some additions to my beauty routine. I have heard that cocoa butter can help improve the elasticity of your skin, which can help prevent stretch marks and thought it couldn’t hurt to give it a try. But I quickly realized that cocoa butter is impossible to apply! If you have never used it, it is very difficult and not buttery at all, as the name suggests. To make it more usable, I decided to mix it in this beaten body butter and it turned out to be a total decadent!It only has one ingredient in addition to the cocoa butter -vocoud oil -and it is super downy, chocolate -like smelling and probably my favorite beauty -do -all time. It does not feel rich but not fat when applied, and unlike other lotions that I have made in the past, it is so easy to store (yes, meant play)!Supplies:–Cocoa Butter (make sure it is a pure, unrefined person)–Avocado oil (feel free to suppress in another mild-oriented oil, such as almond. Everything that is stronger can mask the tasty chocolate odor!)-Alig glass container-Electric -Kloppers-A heat -resistant bowl and potMeasure 1/2 cup of avocado oil and 1 cup of cocoa butter and combine in a bowl.Let a few centimeters of water simmer in a pot and place the bowl (but not touching) the water to melt the cocoa butter. When everything has melted, remove the bowl from the heat and place in the fridge for about an hour. Make sure that none of the condensation comes in on the outside of the bowl! The chilled mixture must be soft; If it gets too much going, let it heat up somewhat at room temperature. Mix the bangpers for 3-4 minutes until it is light and airy..u729b7ff69cef7faae0319c7510978446 { padding:0px; margin: 0; padding-top:1em!important; padding-bottom:1em!important; width:100%; display: block; font-weight:bold; background-color:#eaeaea; border:0!important; border-left:4px solid #34495E!important; text-decoration:none; } .u729b7ff69cef7faae0319c7510978446:active, .u729b7ff69cef7faae0319c7510978446:hover { opacity: 1; transition: opacity 250ms; webkit-transition: opacity 250ms; text-decoration:none; } .u729b7ff69cef7faae0319c7510978446 { transition: background-color 250ms; webkit-transition: background-color 250ms; opacity: 1; transition: opacity 250ms; webkit-transition: opacity 250ms; } .u729b7ff69cef7faae0319c7510978446 .ctaText { font-weight:bold; color:#464646; text-decoration:none; font-size: 16px; } .u729b7ff69cef7faae0319c7510978446 .postTitle { color:#9B59B6; text-decoration: underline!important; font-size: 16px; } .u729b7ff69cef7faae0319c7510978446:hover .postTitle { text-decoration: underline!important; } See alsoIntroduction of Skintuition SPF 30 Radiance boosting Liquid Foundation: A Clean Beauty, Weightless Coverage Foundation with Skincare BenefitsSpoon the finished butter in a clean container and enjoy it! It should take at least a few months if it is stored at a cool location. My body butter filled a 12 oz. Container, tightly packaged, with a little remaining.I found these wooden lids made for a variety of weck pot sizes, which give the pot a safe seal. I made the label with a scalloped circle punch, chic wrapping paper and some stick on letters. I think it is absolutely cute enough to give as a gift to anyone who likes to smell like chocolate – careful or not! Will it keep my belly stretch-mark-free? Time will learn, but in the meantime my skin feels good. XO KayleighCredits // Author and photography: Kayleigh Kosmas. Photos edited with a color story desktop.
 Beauty
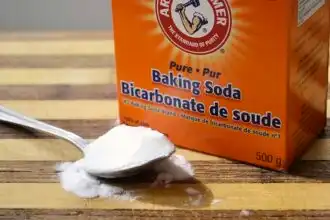
5 Baking Soda Hacks for a Pretty Face ⋆ BeautyNews
Baking soda can beautify your face. Don’t you believe this? Read these baking soda hacks to learn more!Baking soda or sodium bicarbonate is one of those wonder powders with versatile uses. From your kitchen to the garden, there are many baking soda hacks to look at. But do you know that you can look BEAUTIFUL?ContentsBaking soda can beautify your face. Don’t you believe this? Read these baking soda hacks to learn more!1. Face scrub2. Skin brightening agent3. To have shiny teeth4. Acne Removal Paste5. Sunscreen pacifier1. Face scrubBaking soda is a natural scrub and it works really well. Using it will give your face the deep wash look it really needs. Try mixing one part baking soda, one part oatmeal, and one part water for a messy mixture to get rid of those hard-to-remove layers of dead skin and oil. Be careful not to get carried away as it can be quite harsh when it comes to exfoliating scrubs. But if you apply it carefully and gently, your skin will feel fresh, soft and flawless! Also the tight and tingling feeling afterwards is so satisfying.2. Skin brightening agentIf your face is losing its natural color or you want to brighten up your skin tone, give this a try. A few drops of lemon juice, olive oil and baking soda. This mixture is perfect as a face mask and acts as a NATURAL BLEACH. Apply it on your face and leave it on for about 10 minutes before rinsing it off with water..u739f3516ce5a249b3691017e3374b26b { padding:0px; margin: 0; padding-top:1em!important; padding-bottom:1em!important; width:100%; display: block; font-weight:bold; background-color:#eaeaea; border:0!important; border-left:4px solid #34495E!important; text-decoration:none; } .u739f3516ce5a249b3691017e3374b26b:active, .u739f3516ce5a249b3691017e3374b26b:hover { opacity: 1; transition: opacity 250ms; webkit-transition: opacity 250ms; text-decoration:none; } .u739f3516ce5a249b3691017e3374b26b { transition: background-color 250ms; webkit-transition: background-color 250ms; opacity: 1; transition: opacity 250ms; webkit-transition: opacity 250ms; } .u739f3516ce5a249b3691017e3374b26b .ctaText { font-weight:bold; color:#464646; text-decoration:none; font-size: 16px; } .u739f3516ce5a249b3691017e3374b26b .postTitle { color:#9B59B6; text-decoration: underline!important; font-size: 16px; } .u739f3516ce5a249b3691017e3374b26b:hover .postTitle { text-decoration: underline!important; } See alsoDiamond Face Shape: Enhancing Your Natural Beauty3. To have shiny teethRinse your mouth a few times with a combination of baking soda and water to remove bad breath and get shinier teeth. You can also rub a damp toothbrush into the baking soda and scrub your teeth with it.4. Acne Removal PasteUse a 3:1 solution of baking soda and water, mix them up, and rub it on any unsightly blemishes or acne you’re experiencing. After about 10 minutes, wipe it off with a warm washcloth and wash your face with cool water.5. Sunscreen pacifierDo you have sun-tanned skin? Try mixing a very small amount of baking soda with cold water and apply it to your face like a face mask. The slight tingling sensation you may feel, but keep it for a while, about 10 minutes, then rinse your face with water.
 Beauty
Benefits of Steaming Face With Lemon ⋆ BeautyNews
Lemon has an array of health and beauty advantages! Besides, there are quite a few benefits of steaming face with lemon as well!Lemon, with a binomial name ‘Citrus limon’, relates to the ‘Rutaceae’ group. Its fruit is used in cooking, baking, haircare, skincare, and kitchen cleaning. Furthermore, the essential oil derived from the peel of fresh lemons is utilized for various therapeutic, aromatherapy, and in face steaming sessions as well.ContentsLemon has an array of health and beauty advantages! Besides, there are quite a few benefits of steaming face with lemon as well!Lemon Nutrition FactsBenefits of Steaming Face With Lemon1. Possess Antioxidant Properties2. Good Antimicrobial Agent3. Has Astringent EffectsHow to Steam Your Face With Lemon?Lemon Nutrition Facts100 gms of Lemons (raw, without peeled) containsCalories 29Carbohydrates 9.32 gFat 0.3 gProtein 1.1 gVitaminsThiamine (B1) 0.04 mgRiboflavin (B2) 0.02 mgNiacin (B3) 0.1 mgPantothenic acid (B5) 0.19 mgVitamin B6 0.08 mgFolate (B9) 11 μgCholine 5.1 mgVitamin C 53 mgMineralsCalcium 26 mgIron 0.6 mgMagnesium 8 mgManganese 0.03 mgPhosphorus 16 mgPotassium 138 mgZinc 0.06 mgSodium 2 mgCopper 0.037 mgBenefits of Steaming Face With LemonFacial steaming reopens the blocked skin pores, while the lemon acts as an active ingredient. There are some benefits of steaming your face with lemon that is discussed below!1. Possess Antioxidant PropertiesThe lemon essential oil is rich in antioxidant properties that prevent the loss of skin tissue and lipid peroxidation by controlling the damage caused by the free radicals. Furthermore, its a natural detox as well. Either use it topically or as an aromatherapy agent in the face steaming therapies to get its benefits..u56162be54d10a2cfbdc31824ee1a6501 { padding:0px; margin: 0; padding-top:1em!important; padding-bottom:1em!important; width:100%; display: block; font-weight:bold; background-color:#eaeaea; border:0!important; border-left:4px solid #34495E!important; text-decoration:none; } .u56162be54d10a2cfbdc31824ee1a6501:active, .u56162be54d10a2cfbdc31824ee1a6501:hover { opacity: 1; transition: opacity 250ms; webkit-transition: opacity 250ms; text-decoration:none; } .u56162be54d10a2cfbdc31824ee1a6501 { transition: background-color 250ms; webkit-transition: background-color 250ms; opacity: 1; transition: opacity 250ms; webkit-transition: opacity 250ms; } .u56162be54d10a2cfbdc31824ee1a6501 .ctaText { font-weight:bold; color:#464646; text-decoration:none; font-size: 16px; } .u56162be54d10a2cfbdc31824ee1a6501 .postTitle { color:#9B59B6; text-decoration: underline!important; font-size: 16px; } .u56162be54d10a2cfbdc31824ee1a6501:hover .postTitle { text-decoration: underline!important; } See alsoThe 10 Best Natural and Organic Acne Face and Body Wash 20232. Good Antimicrobial AgentThe extract of lemon peel is a good antimicrobial agent that inhibits the skin infection caused by the Pseudomonas and Micrococcus bacteria. Furthermore, it reduces acne and blackheads as well.3. Has Astringent EffectsLemon juice has astringent properties that shrink your open skin pores. That’s why you’ll not require any facial toner to contract the skin pores after a hot facial steaming session to avoid the deposit of dirt and grime into it.How to Steam Your Face With Lemon?Try the below lemon face steaming therapy at home to reap its stress-relieving benefits without any hassle!SuppliesFour Cups of WaterThree Drops of Lemon Essential OilJuice & Peel of 1/2 LemonOne Large Heat Proof Mixing Bowl (Avoid the Plastic One)A TowelOne Cooking PotDirectionsAdd the juice and the peel of 1/2 lemon into a cooking pot along with four cups of water. Place the pot on the stove to simmer it for 3 to 4 minutes.After that, empty the solution into a large heatproof mixing bowl and mix three drops of lemon essential oil into it.First, clean your face and sit in a comfortable position, then place your face at the top of the bowl and cover the head using a towel. Maintain a suitable gap to avoid any skin burning sensation.Take this mist for about 2 to 3 minutes, then cleanse your face with lukewarm water.Use this method at home, once a week, to utilize its immense skin benefits.Note:Before taking a facial steaming therapy at home, use a moisturizer if you’ve dry or sensitive skin..uaac2cb723746c368ea20fbfff55f0192 { padding:0px; margin: 0; padding-top:1em!important; padding-bottom:1em!important; width:100%; display: block; font-weight:bold; background-color:#eaeaea; border:0!important; border-left:4px solid #34495E!important; text-decoration:none; } .uaac2cb723746c368ea20fbfff55f0192:active, .uaac2cb723746c368ea20fbfff55f0192:hover { opacity: 1; transition: opacity 250ms; webkit-transition: opacity 250ms; text-decoration:none; } .uaac2cb723746c368ea20fbfff55f0192 { transition: background-color 250ms; webkit-transition: background-color 250ms; opacity: 1; transition: opacity 250ms; webkit-transition: opacity 250ms; } .uaac2cb723746c368ea20fbfff55f0192 .ctaText { font-weight:bold; color:#464646; text-decoration:none; font-size: 16px; } .uaac2cb723746c368ea20fbfff55f0192 .postTitle { color:#9B59B6; text-decoration: underline!important; font-size: 16px; } .uaac2cb723746c368ea20fbfff55f0192:hover .postTitle { text-decoration: underline!important; } See also10 Homemade lipstif recipes for beautiful lips of course ⋆ Clear thingsBy reading the above benefits of steaming face with lemon, you’ll get to know why it’s important for your skin’s health in today’s fast-paced life.